Getting started
The first thing you need is a collection. A collection will contain the purchase and sales data for a single company (or warehouse). Based on the historical data you provide, Mantissa will train AI models that you can use to obtain predictions and analytics.
When you create a new collection, there is no data in it. In order to use Demand Prediction, Lead Time Prediction, Safety Stock, or Reorder Point functionalities, you first have to upload the historical data into the collection.
OpenAPI
For comprehensive details on all generic platform operations, please refer to the OpenAPI documentation available at the following URL: OpenApi documentation.
The OpenAPI documentation provides extensive information on the API endpoints, including their methods, parameters, and responses. It is the go-to resource for understanding the underlying operations of the platform.
While the OpenAPI documentation covers the generic aspects of the platform, specific parameters and configurations unique to our implementation are detailed within this documentation.
Make sure to consult both the OpenAPI documentation and this document to get a complete understanding of the platform's capabilities and how to effectively utilize them for your specific needs.
Postman Collection
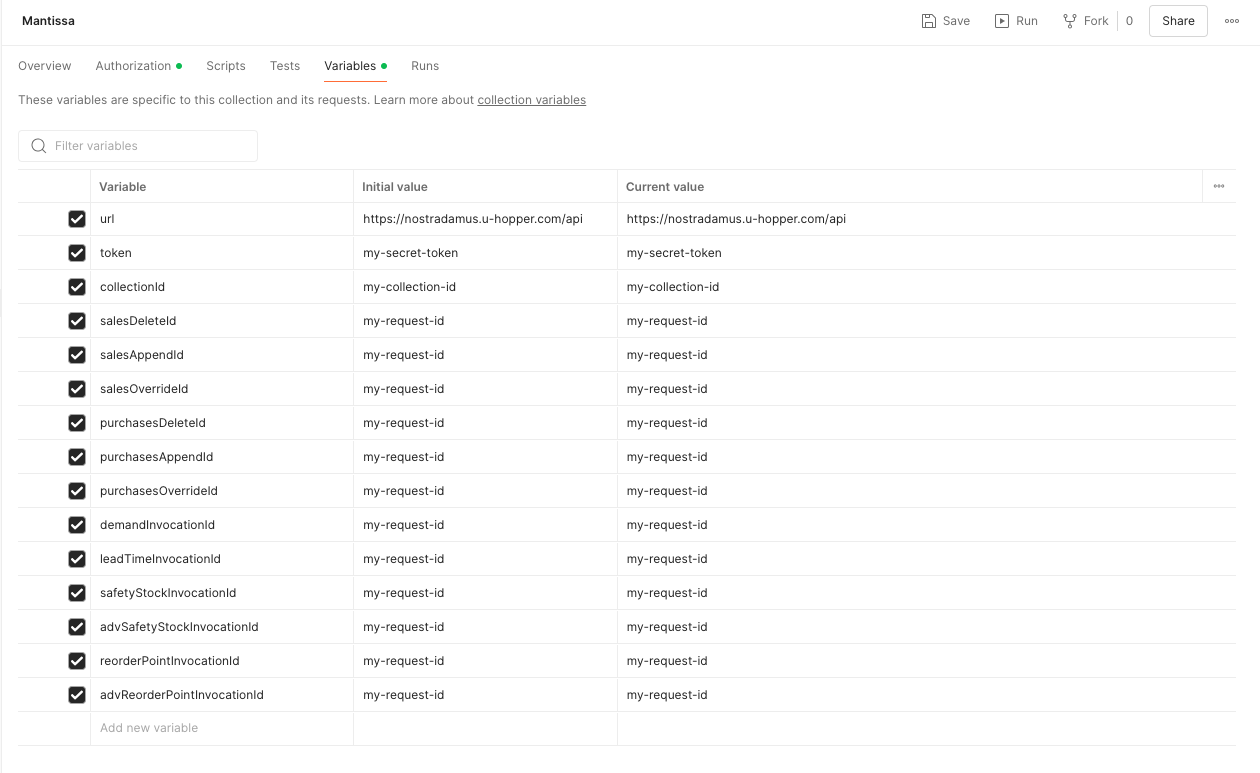
Here you can find a Postman collection containing an example for every request available in Mantissa.
The collection has a set of placeholder variables you can modify in the "Variables" tab of your Collection on Postman. In particular:
- replace
my-secret-tokenwith your API token; - replace
my-collection-idwith the identifier of the collection you want to use; - replace
my-request-idwith the identifier of the request you want to check (more details below).
How to integrate
In the sequence diagram above you can find the step required for getting an invocation with Mantissa, the required steps are:
- Create a collection.
- Upload some data.
-
Invoke Mantissa in order to get prediction and analytics.
Create a collection
To create a collection, you need to send a POST request to the collection endpoint. Required parameters to be specified in the request body are:
name: the name of your choice;product: Mantissa;timezone: the default timezone for the collection.
Additionally you can specify:
tag: Additional metadata that can be associated to the collection.
No additional properties are required for Mantissa.
- Curl
- Python
curl --location 'https://nostradamus.u-hopper.com/api/collection' \
--header 'Content-Type: application/json' \
--header 'Authorization: Token my-secret-token' \
--data '{
    "name": "My Collection",
    "product": "Mantissa",
    "timezone": "Europe/Rome",
    "tag": {},
    "properties": {}
}'
import requests
import json

url = "https://nostradamus.u-hopper.com/api/collection"

payload = json.dumps({
    "name": "My Collection",
    "product": "Mantissa",
    "timezone": "Europe/Rome",
    "tag": {},
    "properties": {}
})
headers = {
    'Content-Type': 'application/json',
    'Authorization': 'Token my-secret-token'
}

response = requests.request("POST", url, headers=headers, data=payload)

print(response.text)
You can retrieve the list of the collections associated to your account by sending a GET request to the collection endpoint. For more details about the collection management, see Collection.
Upload data
Mantissa supports two data types: sales_orders and purchase_orders. Each data history is loaded into a collection via a POST request, in which the type of data being loaded is specified.
Data has to be passed in csv format. For details about the required data schema, see Data schemas.
The request endpoint to append new data into a collection is /api/collection/{collectionId}/data/{dataType}/append, where:
collectionId: the identifier of the collection into which you want to upload the data;dataType: sales_orders or purchase_orders.
In the request body, you need to specify as a form-data field:
file, the csv file containing the data to be uploaded;separator, the separator of the csv file (e.g. ",").
In the following you can find an example for uploading data of type sales_orders via curl and python.
- Curl
- Python
curl --location'https://nostradamus.u-hopper.com/api/collection/{my-collection-id}/data/sales_orders/append' \
--header 'Authorization: Token my-secret-token' \
--form 'file=@"my-data-path/my-sales_orders-data.csv"' \
--form 'separator=","'
import requests
import json

url = "https://nostradamus.u-hopper.com/api/collection/{my-collection-id}/data/sales_orders/append"

payload = {'separator': ','}

files=[
  ('file',('my-sales_orders-data.csv',open('my-data-path/my-sales_orders-data.csv','rb'),'text/csv'))
]
headers = {
  'Authorization': 'Token my-secret-token'
}

response = requests.request("POST", url, headers=headers, data=payload, files=files)

print(response.text)
You can find an example CSV with the required structure here.
At each upload request, the platform validates the data to ensure they conform to the schema. If the data do not conform, the upload request is rejected with the validation errors that caused the non-conformity.
The upload request's status changes from queued, in_progress, completed, error. When the status is completed, it means the validation process is successfully terminated and your data upload has been accepted by the platform.
On the contrary, the status error indicates that the validation process terminated with errors; the failure motivation will appear in validationErrors.
You may need to poll the platform periodically to check the status of your request. This ensures that you receive timely updates on the progress and outcome of your request.
Ensure that your upload request is successful (i.e. status: completed) before submitting an invocation request. Otherwise, the predictions or analyses you request will either be inaccurate (if the collection already contains data) or the invocation request will fail (if the collection does not have any data uploaded correctly).
To get the status of the upload request with id requestId, you can send a GET request to the /api/collection/{collectionId}/data/{dataType}/append/{requestId} endpoint.
The response will contain the status of the request, as well as any validation errors that may have occurred.
Here is an example of how to get the status of an upload request with id my-upload-request-id and dataType sales_orders via curl and python.
- Curl
- Python
curl --location 'https://nostradamus.u-hopper.com/api/collection/{my-collection-id}/data/sales_orders/append/{my-upload-request-id}' \
--header 'Authorization: Token my-secret-token'
import requests

url = "https://nostradamus.u-hopper.com/api/collection/{my-collection-id}/data/sales_orders/append/{my-upload-request-id}"

payload = {}

headers = {
  'Authorization': 'Token my-secret-token'
}

response = requests.request("GET", url, headers=headers, data=payload)

print(response.text)
Mantissa works best if the data on a collection are always up-to-date. Whenever you wish to add new points to the data history, use a POST request as above: all new data will be added to the already existing history after the validation process.
Invoke Mantissa
You can invoke one of the functionalities by sending a POST request to the invocation endpoint, specifying the invocation type.
Mantissa supports multiple invocation types, each requiring different data to be present in the collection. The following table shows which data are required for each invocation type:
| Invocation Type | Sales Orders | Purchase Orders |
|---|---|---|
| demand-prediction (see Demand Prediction) | ✔️ | |
| lead-time-prediction (see Lead Time Prediction) | ✔️ | |
| safety-stock (see Safety Stock of type Base) | ✔️ | ✔️ |
| adv-safety-stock (see Safety Stock of type Advanced) | ✔️ | ✔️ |
| reorder-point (see Reorder Point of type Base) | ✔️ | ✔️ |
| adv-reorder-point (see Reorder Point of type Advanced) | ✔️ | ✔️ |
The parameters you have to specify in the request body are:
collectionId: the identifier of the collection on which the historical data necessary for successful invocation have been previously uploaded;invocationType: type of invocation;args: dictionary containing extra arguments, depending on the invocation type.
Based on the invocation type, extra arguments are necessary. More details can be found here.
Invocation example: demand-prediction
Here you can find an example in which a demand-prediction invocation is requested.
- Curl
- Python
curl --location 'https://nostradamus.u-hopper.com/api/invocation' \
--header 'Content-Type: application/json' \
--header 'Authorization: Token my-secret-token' \
--data '{
    "collectionId": "my-collection-id",
    "invocationType": "demand-prediction",
    "args": {
        "horizon": 8,
        "start_date": "2024-01-01",
        "granularity": "W",
        "aggregation": "item"
    }
}'
import requests
import json

url = "https://nostradamus.u-hopper.com/api/invocation"

payload = json.dumps({
    "collectionId": "my-collection-id",
    "invocationType": "demand-prediction",
    "args": {
        "horizon": 8,
        "start_date": "2024-01-01",
        "granularity": "W",
        "aggregation": "item"
    }
})
headers = {
    'Content-Type': 'application/json',
    'Authorization': 'Token my-secret-token',
}

response = requests.request("POST", url, headers=headers, data=payload)

print(response.text)
The endpoint will reply with the details of the request, including the id of the request.
Results retrieval
The results of the invocation will not be available immediately: you may need to poll the platform periodically to check the status of your request. As for data upload requests, states are: queued, in_progress, completed, error.
The error status indicates that your request failed, with the motivation expressed in invocationErrors.
Once your request reaches the completed status, you can retrieve the results using a GET request to the appropriate endpoint. The available formats for retrieving results are: csv, json, xlsx. Details on the endpoints can be found here: OpenApi documentation.
Invocation retrieval example: demand-prediction
{
    "id": "my-invocation-request-id",
    "collectionId": "my-collection-id",
    "invocationType": "demand-prediction",
    "args": {
        "horizon": 8,
        "start_date": "2024-01-01",
        "granularity": "W",
        "aggregation": "item"
    },
    "status": "queued",
    "message": null,
    "invocationErrors": null,
    "invocationResults": null
}
Using the id of the request is possible to check the status of the request:
- Curl
- Python
curl --location 'https://nostradamus.u-hopper.com/api/invocation/{invocation-id}' \
--header 'Authorization: Token my-secret-token'
import requests

url = "https://nostradamus.u-hopper.com/api/invocation/{invocation-id}"

payload = {}
headers = {
  'Authorization': 'Token my-secret-token',
}

response = requests.request("GET", url, headers=headers, data=payload)

print(response.text)
When the status of request changes to completed is possible to download the produced results of the invocation in the formats in which these are available, including json, csv and xlsx.
In fact, an invocation can produce multiple results, and each result can be available in different formats.
The primary result is the one that is considered the main result of the invocation while the others are accessory results.
The following example shows how to retrieve the primary result of an invocation in JSON format:
- Curl
- Python
curl --location 'https://nostradamus.u-hopper.com/api/invocation/{invocation-id}/json' \
--header 'Authorization: Token my-secret-token'
import requests

url = "https://nostradamus.u-hopper.com/api/invocation/{invocation-id}/json"

payload = {}
headers = {
  'Authorization': 'Token my-secret-token',
}

response = requests.request("GET", url, headers=headers, data=payload)

print(response.text)
For more details about the invocation results, see Retrieve Invocation Results.